Showing posts with label baking. Show all posts

Wednesday, October 17, 2012

A love letter to fall.


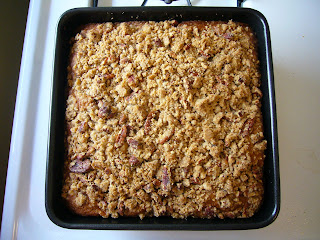
I equate fall with baking, it's just that simple. Lately I find myself choosing to spend more time indoors lately - nesting, reading, puttering and even better, nesting in my kitchen.  I have written a couple love letters to fall, this one in particular, is a keeper. Like the last post, this recipe for pumpkin pie bars was something I repinned on Pinterest and baked over the weekend for friends.

After popping this into the oven, I recognized that I have held "bars" (as in dessert bars) at arms-length.  Not squite sure why, but I think that I subconsciously filed "dessert bars" in my "do not attempt" dessert category. Boy, I  have been missing out. To every season, turn, turn.....it all comes full circle and now I'm obsessively looking through recipes and cookbooks in collection that include more dessert bar recipes.

These pumpkin pie bars are easy to make (in fact, I think this would be a fun one to make with kids) and they are effortless.  Most of these ingredients are staples in your pantry and I'm stocking up on canned pumpkin this fall (it will be on sale closer to Thanksgiving) as I know I will be making these again and again.

Pumpkin Pie Bars

Crust Ingredients:
1 1/3 c. unbleached white flour
1/2 c. brown sugar
1 stick unsalted butter, softened
3/4 c. chopped pecans


Filling Ingredients:
8 oz cream cheese, softened
3/4 c. sugar
1/2 c. pumpkin puree
2 eggs, slightly beaten
1 1/2 tsp. cinnamon
1 tsp. allspice
1 tsp. vanilla 


Directions: 
Preheat the oven to 350 degrees Fahrenheit.
  
In a food processor, combine crust ingredients and pulse two or three times until mixture is crumbly. Reserve 2/3 cup of the mixture for topping. Press remaining mixture evenly into the bottom of an 8x11 baking dish. Bake at 350 degrees F for 15 minutes. Cool slightly.  

In a medium bowl, combine filling ingredients. Using an electric mixer at medium speed, blend until mixture is smooth. Pour mixture over baked crust. Sprinkle with remaining crust topping. Bake at 350 degrees F for 30-35 minutes or until firm.

Sunday, August 5, 2012

Hello, Zucchini Bread.


Like many of you, I subscribe to umpteen e-mails/newsletters.  It's a vicious cycle like my former magazine subscription addiction and I find it difficult to stop, but that's another psycho-babble post for another time.  

This past week I received a newsletter from The Gourmandise School of Sweets & Savories, where I took a macaron class earlier this year. In addition to promoting new classes they are offering, they always include a recipe to entice you. This week it worked and I made this lovely quick bread, Zucchini and Strawberry Jam Bread. Moist, delicately sweet and summery, it's a quick way to whip something up to bring to a winding-down summer cookout or any gathering of friends, family and food. And I think it's a flexible recipe, if you're not crazy about strawberry jam, why not use apricot jam? Also, I opted to not use the sliced strawberries.

Zucchini & Strawberry Jam Bread (courtesy of The Gourmandise School of Sweets & Savories)

This  recipe makes about 6 muffins or small loaves and one medium loaf, but can easily be doubled.

In a medium bowl, whisk together:
3/4 cup plus 2 Tbsps flour
1/4 tsp baking soda
1/2 tsp baking powder
1/4 tsp salt
1/2 tsp cinnamon

In a larger bowl, whisk together:
1 egg
1/4 cup vegetable oil
1/3 cup sugar
1/4 cup strawberry jam 

Set aside:
1 cup grated zucchini
1/2 cup sliced strawberries

1) Whisk together your flour, salt, baking powder, baking soda and cinnamon.
2) In another bowl, whisk together the egg, oil, sugar and jam.  Add the zucchini and mix until combined.
3) Fold in flour and mix until just combined.
4) Pour into muffin pans or molds and bake at 350 for 15-20 minutes for smaller and 25 minutes for larger loaves.  Before baking, arrange strawberry slices over the batter.

Friday, May 18, 2012

Mexican Chocolate Cake.

In honor of the Cinco de Mayo party I attended and the rare rise of the "super moon" , I baked a cake (well, actually two). I originally was going to use a recipe I cut from the Los Angeles Times, eons ago, but decided to do a quick search for Mexican chocolate cake recipes online.  This one popped up first from Baked Bree, who I met at Camp Blogaway, a year and a half ago.


Initially, what intrigued me about Bree's recipe was that she did not use the mexican chocolate tablets and she used balsamic vinegar in her cake batter. The cake is complex in flavor, but not over-powering.  The frosting is perfection, creamy, light and slightly sweet.  If you're looking for something special and unique, I'd definitely recommend giving this cake a try!

Wednesday, May 16, 2012

The Perfect Marriage.

What's the perfect marriage? When it comes to pairing foods, I think the victory belongs to Mr. Salty and Mrs. Sweet. Bake shops, food trucks and restaurants are taking a gamble on this perfect pairing with the likes of chocolate covered bacon, sea salted caramels, bacon brittle and more.

Like many of you, I have a little problem with a website called Pinterest and I recently tried a cookie recipe that was pinned - a chocolate chip and pretzel inspired cookie. I tweaked the recipe slightly, the original recipe included peanut butter chips and I'm not a huge fan of those baking chips.  Instead I added more broken pretzel chips and the results left friends happy and reaching for more.  Soft, chewy, sweet, salty, it satisfies all those inner kid cravings.

Chocolate Chip and Pretzel Cookies (adapted from recipe found on Pinterest)
1 ½ c. all purpose flour
½ tsp. kosher or sea salt
¼ tsp. baking soda
½ c. unsalted butter, room temperature
½ c. light brown sugar
1/3 c. sugar
1 egg, beaten
1 tsp. vanilla extract
1 c. chocolate chips
1 c. broken pretzel pieces
Sea salt
Directions:
In a medium bowl, sift together the flour, baking soda and salt.

In a large bowl or stand-up mixer, beat the butter and sugars together on medium speed until light and fluffy (2-3 minutes).  On low speed, slowly add the beaten egg and vanilla extract.  Beat to combine, scrape down the sides of the bowl.

Add the flour mixture and beat until there are no more streaks of flour.  Stir in the chocolate chips and pretzel pieces.  Cover and refrigerate for at least an hour, if not longer. The longer, the better. 

Preheat the oven to 350 degrees. Line baking sheets with parchment paper or a silpat mat.  Scoop out well rounded tablespoonfuls of the dough and sprinkle each cookie with sea salt. Leave about 2 inches between each cookie and bake for 10 minutes.  If you like a crisper cookie, leave in the oven for an additional 1-2 minutes.  Allow the cookies to cool on the baking sheet for a few minutes before removing to a cooling rack.

Sunday, February 19, 2012

Turning 10.


Do you remember when you turned 10? There is something about a child entering the "double digit" years that is momentous.  A very special almost-10-year-old I know celebrated her soon-to-be birthday this past weekend. She and her mom planned a sweet bake shop theme.  The plan was for the birthday girl and her friends to decorate cupcakes, cookies and make other treats - chocolate covered marshmallows, strawberries, pretzel sticks and more. It was a blast to watch and sneak in a few decorated treats myself.

Of course, the kicker for me was that she asked me to bake a dozen of her favorite cupcakes - red velvet, for the occasion. In the meantime, I started to panic a little bit, I desperately wanted these cupcakes to be *perfect*. When someone asks you to make something for an event to be remembered, I tend to feel the added bit of pressure, so I scoured the Internet for the *perfect* recipe. 

I heart Tasty Kitchen. Bookmark. It. Now. It's one of my go-to-websites for recipes and suggestions. Test, tried and true, I have yet to make something from that site I didn't like and/or love. There I found several potential recipes, but honed in on one particular title that was rather confident - Red Velvet Cake To Die For. The reviews were glowing and I trusted my instincts on this one.  

They turned out fantastic and this perfectionist baker was quite pleased with the results. Moist, delicious, light and very very red. Mission accomplished. The original recipe is for a two layer cake, but I opted to lower the baking time (approximately 20-24 minutes, depending on your oven) and I was able to turn out 16 cupcakes.  I also think the trick here is a light hand and to mix everything by hand - so for those with control issues, this recipe is right up your alley!

Saturday, September 10, 2011

I'm a Snicker, You're a Doodle


I can't tell you the last time I made a batch of snickerdoodles and in all honesty, I wasn't a big fan of snickerdoodles.  I have a slight issue with "too much" cinnamon.  Don't get me wrong, I really like cinnamon, but in minimal doses.  So this cookie hasn't been on my "favorite" list.

I was talking to one of the attorneys I work with about cookies and the snickerdoodle came up in conversation.  Something along the lines of...."Teryll, what's the status of this very important legal document, you know, the one about the history and legalization of snickerdoodles?".  Okay, maybe the conversation didn't exactly flow that way, but it sparked my interest to give them another try and bake a batch over the weekend.

I've recently been turned on to The Tasty Kitchen and have found great success with several other recipes. The snickerdoodle recipe I tried can be found here. Friends, the snickerdoodle has been resurrected.  I chilled the dough for about 15 minutes in the fridge so that it was easier to roll into balls and roll into the sugar-cinnamon mixture before popping them into a 400 degree oven.  The key is also not to overbake them, no more than 8 minutes. This cookie is soft, buttery, sweet, with a slight hint of cinnamon.  It's divine and addictive.  Perfect alone, with coffee, tea or milk. They would be delicious in an ice cream sandwich too. Go bake a batch, you know you want to.

Wednesday, August 31, 2011

Cardamom Coffee Cake.


The end of summer is drawing near and I've been relying on trusted recipes to see me through these final long summer nights. The summer heat drives me away from the oven and toward simple, low or no heat cooking.  But what I miss most during the summer is baking and I won't allow the heat to deter me from my beloved stove, so I decided to bake you something.

I recently made one of my favorite treats, it's one I learned in cooking school.  It takes coffee cake to a whole new level.  Hold on to your horses, cowboys and cowgirls, this coffee cake honors the blessed spice, cardamom.  Other coffee cake recipes cry out, "We're not worthy!!! We're not worthy!!!!" and it's hard to argue with them.

Cardamom Coffee Cake
2 1/2 c. all purpose flour
1/2 tsp. salt
1 tsp. ground cinnamon
1 tsp. cardamom
1/4 tsp. ground ginger
1 c. brown sugar
3/4 c. white sugar
3/4 c. canola oil
1 c. chopped walnuts
1 tsp. baking soda
1 tsp. baking powder
1 egg
1 c. buttermilk

Preheat oven to 350 degrees.

In a large bowl or bowl of Kitchen Aid stand-up mixer, mic the flour, salt, 1/2 tsp. cinnamon, 1/2 tsp. cardamom, ginger, brown sugar, white sugar, and canola oil.  Remove 3/4 c. of mixture, and add it to nuts and remaining cinnamon and cardamom.  Mix well and set aside.

To remaining batter, add baking soda, baking powder, egg and buttermilk. Mix to combine.

Spread the batter in a prepared 9" square baking pan.  Sprinkle with the topping and bake 40-45 minutes until done.

Saturday, April 16, 2011

Buried Treasure.


I should be concentrating on work related tasks, e-mails, files, projects, etc. but I’m on overload. It’s been a couple weeks of non-stop action at my day job and I have since forgotten how to a) relax and b) enjoy. Now that, my friends, is a real shame, because relaxation and the ability to enjoy (aka pleasure) are prerequisites if you intend on labeling yourself as a foodie.

So for that, I ask for forgiveness and I hope these Buried Cherry Chocolate Cookies will do the trick. Or at least you’ll consider it my first attempt at penance for falling off track.

This recipe has been in my box for nearly ten years – a roommate in college shared it with me and for some reason I allowed this gem of a recipe to collect dust since. Again, double shame on me because these cookies are special. I don’t want to hurt other cookies’ feelings but it’s true. This is not your average cookie on the block and it’s proven to be a real show stopper at social engagements.

In fact, I recently attended a craft party and made these cookies to share with friends as we allowed our creative and crafty juices to flow. I was a wee bit nervous because I had not made them in nearly ten years but after test-tasting one before the party, I knew I would spin a few new converts into my web of pleasure!

Buried Cherry Chocolate Cookies

1 10 oz. jar, maraschino cherries
1/2 c. unsalted butter, softened
1 c. sugar
1/4 tsp. baking powder
1/4 tsp. baking soda
1 egg
1/2 tsp. vanilla
1/4 tsp. salt
1/2 c. unsweetened cocoa powder
1 1/2 c. flour
6 oz. semi-sweet chocolate chips
1/2 c. sweetened condensed milk

Preheat oven to 350 degrees.

Drain cherries, reserving the juice and cut the cherries in half (more than likely you will not need all the cherries, I would cut up 20 to start).

In medium mixing bowl, beat butter on medium speed (if using hand mixer or stand-up mixer)
for 30 seconds. Add sugar, baking powder, baking soda and salt. Then incorporate egg and vanilla until combined. Last but certainly not least, add the cocoa powder and flour. Shape dough into 1 inch balls and place 2 inches apart on cookie sheet (lined with parchment paper or silicone mat). Press thumb in center and place one halved cherry.

To make frosting, in a saucepan, combine chocolate chips and sweetened condensed milk. Over low heat cook, stirring regularly until combined and melted. Stir in 4 tsp. of the cherry juice and spoon about a tsp. of mixture over each cherry. Bake cookies for 10 minutes.

Monday, March 28, 2011

Don't Be Scared.


Every home cook has a number of recipes under their belt - they are cool, calm and confident when in the kitchen dolling these dishes out. But.....there are also a few recipes where we've scratched our heads or perhaps shied away from making them because there's fear or uncertainty.

When I pick up a latte at a coffee shop, sometimes I pick up a scone. And let's face it, most of us have experienced what certain retailers define as a "scone" but when in actuality it should be marketed as a "dry, flavorless piece of cardboard". Hmmmm....I wonder how the marketing gurus at Starbucks would come up with a smart marketing campaign for those?!?

Anyhow, I've been on a scone rant lately (an internal rant) and I realized that I've avoided baking scones for a while. Back in the day, I made them every so often, but never was overly thrilled with the results. No matter how many articles I digested, there wasn't a recipe that turned out exactly how it should. One could argue there are a variety of reasons for that - badly written recipe, oven temperature issues, over-handling of the dough, butter wasn't chilled enough, etc. Really and truly, I hope one doesn't go into therapy over this, but as you can tell a failed batch of scones can send someone into a deep depression.

Alas, this wasn't the case on Sunday. In between recuperating from helping out with a fundraiser on Saturday and cleaning my kitchen, I got the energy to make a batch of scones and I do have to say I was a happy girl. I didn't spend too much time pining over recipes, I relied on my trusty copy of The Art & Soul of Baking. The recipe is for Cream Scones and I added a scant 1/2 cup of dried cranberries.

Cream Scones with Dried Cranberries (adapted from The Art & Soul of Baking)

2 c. unbleached all-purpose flour
1/2 c. sugar
2 1/2 tsp. baking powder
1/4 tsp. salt
1 stuck unsalted butter, cut into cubes and chilled
1 c. chilled heavy whipping cream
1 egg, lightly beaten
1 tbs. sugar
1/2 c. dried cranberries

Preheat oven to 425 degrees and position an oven rack in the center. Line the baking sheet with parchment paper or a silicone mat. Place the flour, 1/2 c. sugar, salt and baking powder in a food processor and process for 10 seconds to blend well. Add the cold butter and pulse 5 times at 1-second intervals, or until the butter is cut into medium pieces. Add the cream and cranberries and pulse another 20 times, or until the dough holds together in small, thick clumps. Use a spatula to scrape the dough out onto a lightly floured work surface. Gently squeeze together until they form a cohesive dough.

Pat the dough into a circle about 7 inches in diameter and about an inch thick. Use a chef's knife to cut the dough into 8 equal wedges and transfer to the prepared baking sheet, spacing them about 2 inches apart.

Brush the tops with a thin coasting of the lightly beat egg. Sprinkle evenly with the sugar and bake for 14-16 minutes, until firm to the touch and golden brown. Transfer to a rack and let cool for 5 minutes.

Monday, March 14, 2011

YOU'RE ALL WINNERS!!!!!!!!!!!!!!!!!!


Hello friends, well since 8 lovely individuals took the time post something on Madame Munchies, you all will get a copy of my zine!!! Thanks for continuing to support my blog, much love to all!

P.S. - E-mail me your address (pumpkingrl_1031@hotmail.com) and I will mail you a copy of the zine this week!

Wednesday, March 9, 2011

HOT OFF THE PRESSES!!!!!! A ZINE GIVEAWAY!!!!


For the last 9 months or so, I've been stewing and brewing up my very first ZINE!!! What's a zine you ask? It's an independently published magazine. They can be about anything you can imagine and it's a unique subculture amongst the zinesters out there.

So without further ado, Bitchin' Kitchen presents Cake Geek Volume I - my first foodie zine dedicated to cake recipes! These are easy cakes, perfect for any occasion!

Want to win a copy for FREE???? Just post a comment below on the blog and be entered to win! Comments can be posted until Sunday night 11:59 pm PST. FIVE WINNERS WILL BE SELECTED and (using www.random.org) will be revealed on Monday, March 14th! SPREAD THE WORD!!!!

Wednesday, January 26, 2011

Muffin Mania.

I guess you could say I've been on a "muffin" roll this month. Last week Molly Wizenberg of Orangette featured a post on ginger muffins from Marion Cunningham's book entitled The Breakfast Book (which I am squeamishly trying to be patient for as I placed it on "hold" at the library). In the meantime, though I was pleasantly pooped after attending a book club meeting, Sunday evening I made a batch of these spicy and energetic little muffins.


At first I was a bit concerned with the amount of fresh ginger used in the recipe. I kept reminding myself, that if Molly used that amount, I should use the same amount too. Trust Molly, trust Molly, trust Molly. After this mini-meditation, I plowed through the simple recipe and this is how they turned out:


Allowing them to cool, I sliced one muffin in half and slathered some softened butter on top each half. I have to say it wasn't what I was expecting. Though the batter included a substantial amount of ginger, it wasn't over the top (or over the muffin top, if you're up for a pun). They definitely had a kick to them, but they were bursting with citrus and spice notes (an not overly sweet, which I like). Easy to see why popping another two into your mouth takes no effort. The batter could easily be turned into a quick bread too. Accompanied with a cold glass of milk, these muffins are a great way to start your day or start someone else's day. Consider serving them at a brunch or party as a dessert too.

Monday, January 17, 2011

Cookie Cult Giveaway!!!


Madame Munchies is having her very first giveaway, and what’s better than a “cookie” giveaway! It doesn’t matter if you’re local or out-of-state everyone can participate and be in the drawing for a batch of my addictive and delicious chocolate chip cookies (pictured above)! All you have to do is post a comment on my blog!

If you’re already a follower, thanks, but if you’re not, become a follower and you’ll be entered again into the drawing. Twice the fun and twice the opportunity to win some cookies!!! Contest ends Saturday, January 22, 2011 at midnight. Winners will be posted Sunday, January 23rd!!! Good luck readers!

Monday, January 10, 2011

2011 Entertaining.


Like most folks I fail at keeping resolutions when it comes to the "new year" and the past couple of years, instead I have resolved to making a list of intentions. A list of intentions does not quite have the same "effect" in that there isn't a looming dark cloud of pressure surrounding you. And at the end of year, when you reflect on that list of intentions, it's pretty neat to see how much you have accomplished.

One of my intentions for 2011 is to entertain more - last February I moved into my place, but I haven't christened it with many gatherings of friends and family. So I kicked off the new year this past weekend by hosting a small brunch and crafty party with two girlfriends. There was laughter, storytelling, crafting, bubbly, sharing, and of course, dining. The menu included a frittata, hash brown casserole, and banana nut muffins (as depicted above).

Frittatas are fun, inventive, and have a mind of their own. I understand the irrational fear of omelette making, but I'm still puzzled by those who are afraid of a little thing called a frittata. Not only are they easy to make, there are an infinite number of possibilities when it comes to ingredients to add to this baked egg wonder. I added ribbons of kale, purple asparagus, sundried tomatoes and shredded pecorino romano cheese.

The hash brown casserole was a recipe I found online (the link above will take you there) and turned out to be a carb/cheese lover's dream. This isn't exactly "healthy" but it sure did fit the bill and makes a great side dish for breakfast, lunch or dinner!

The super moist banana nut muffins were from one of my most reliable baking books, The Weekend Baker. What's great about this book is its layout. Abigail (the author) separated recipes based on timeframe. So if you're looking for quick last minute baking recipes, there's a section devoted to that. if you're looking for more labor-intensive baking, there's a section for that. And her recipe writing skills are hands down some of the best.

Monday, August 23, 2010

Party Favors.


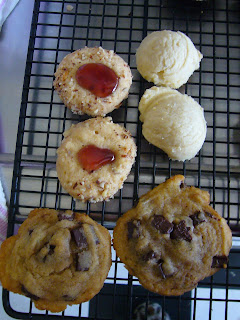
I can't believe I haven't posted anything here in a month, bad blogger, bad blogger!!! My apologies to all of you devoted followers. It's been quite a busy month, between work, birthday parties, going away parties and this past weekend my dad got married. Several months ago my dad and his wife asked me to bake party favors for their guests. We settled on 2 cookies each of the following cookies: my famous chocolate chip cookies, lemon clove cookies (a recipe by Alice Waters) and linzer cookies (the best recipe from Martha Stewart, of course). So I decided to share these with you all, even though none of you can take a bite. I know I'm such a tease.

I decided to package them in Chinese take-out boxes and tie a bit of red tulle for some color. They turned out great and I received several compliments from guests at the reception. The chocolate chip cookies are one of my go-to recipes, it's actually a recipe from a vintage Better Crocker cookbook for kids. These cookies are ridiculously soft and the real key to doing these justice is two fold: 1. the combination of oil and butter and 2. letting the cookie dough rest overnight in the fridge.

I've been an avid fan of Alice Waters' work at Chez Panisse and came across her recipe for Lemon Clove cookies many moons ago. This citrus infused butter cookie is bright and cheery, like sunshine on a crisp morning. Accompanied by a hot cup of java or tea us the perfect accoutrement for this delicate cookie.

When I was in college, I was a devout fan of Martha Stewart and developed a deep respect for linzer cookies, especially her recipe for them. This is another butter cookie rolled in ground hazelnuts and then dolloped with a thumbprint of seedless raspberry jam in the middle. It's one of my dad's favorites and he requested it for the party favors.

I'm seriously considering offering a cookie take-out box for parties, etc. Depending on the request and number of cookies, each box will range from $4-6. If you're interested, please send me an e-mail at madamemunchies@gmail.com for more information.


Saturday, June 12, 2010

Blog Challenge No.5: Compassion and Cupcakes.


How do you pour out compassion? Does it ooze out of you naturally or do you find yourself scrounging for compassion crumbs to dole out? By now you've figured out I love food, cooking, and everything associated or affiliated with it. One of the ways I show compassion is through baking for others - on a somewhat regular basis, if I'm going over to someone's house or a gathering of friends, I'm the foodie nerd bringing some sort of treat.

This week I haphazardly stumbled upon Shauna Sever's blog, Piece of Cake. What drew me to her blog was a random link I found for a cupcake recipe entitle Nutella Cupcakes. How could I resist? I mean, hello, who doesn't L-O-V-E Nutella?!?!? Who wouldn't want to soak in a bathtub of the golden spread?!? Okay, I'm getting a lil' off topic, but this chocolate hazelnut spread could become the next butter in your household, don't say I didn't warn you!

So today these Nutella Cupcakes are my small contribution to the world, my small token of compassion. Enjoy.